Contents
We’ve all been there before – You’ve created a super cool looking website and when it comes time to run a page speed test the results are looking pretty disappointing. Page speed is not only highly important for website ranking, but also needs to load lightning fast for your visitors. For anyone running WordPress, we’re going to go through some ways you can optimize your WordPress page load speed with plugins and some other free options.
Be mindful of the plugins you install!
The most common problem we have found with WordPress and speed test results are the plugins which are installed – While there are some amazing plugins which can greatly benefit your visitors experience, more often than not, these plugins add extra weight and affect your overall page load speeds and have not been optimized for SEO.
While this guide has been made for WordPress installations, most of the speed suggestions we will discuss are also applicable for websites run on other platforms.
Get Started – Benchmark your website:
For the speed tests we’re going to be using 4 online tools to benchmark our website to find out where it ranks and what needs to be improved. Continue to use these tools as you make changes to improve your speed test results.
Optimize your page load speed (Quick Guide):
You can read the full details below, but for those who are short on time, you can start by installing and activating the following plugins to improve your WordPress site.
- Signup and activate Cloudflare
- Enable Auto minify, Cache all pages, set expired headers to 1 month and enable Rocket loader on Cloudflare
- Install WordPress plugin Adaptive Images for WordPress
- Install WordPress plugin EWWW Image Optimizer
- Install WordPress plugin Autoptimize
- Install WordPress plugin Sunny
- Install WordPress plugin CloudFlare
Optimize your page load speed (Detailed):
Using a CDN: Cloudflare
- Install WordPress plugin Sunny
- Install WordPress plugin CloudFlare
The more resources you can serve from a single DNS lookup, the better.
there are two plugins which are useful to use so your website can correctly interact with Cloudflare. the most useful of these is “Sunny”, which once enabled will automatically purge pages/posts every time they are updated. very useful when you want to ensure that your page/post modifications are always serving the latest version to your visitors.
Even websites on shared hosting which boast to provide enhanced caching mechanisms can still be improved with the use of a CDN. For this example we will be using CloudFlare as our CDN. Cloudflare is free to get started and provides all the basic caching technologies to improve your website speed.
Once you have Cloudflare up and running, go through an start enabling the following settings.
- Auto Minify JS, CSS, HTML
- Cache all pages rules
- Set expired headers to 1 Month or more
- Enable Rocket loader
Adaptive Images:
- Install WordPress plugin Adaptive Images for WordPress
Adaptive images for WordPress enables the rendering of different image sizes on different devices. In most cases this plugin is simply click and go. Each time a page is rendered, the images for that page are created in a sub directory which are then served automatically based on the device detected.
At the moment Adaptive Images doesn’t have a “Generate All” button to scan and create adaptive images, nevertheless, over the period of a few weeks, people viewing your most active pages will start to be served the re-sized images to their appropriate devices.
Image Optimization:
- Install WordPress plugin EWWW Image Optimizer
The most common problem we’ve seen in page speed tests are related to the image size and Losslessy compression. EWWW Image Optimizer for WordPress quickly fixes these issues by scanning through and optimizing all your PNG and JPG images.
When using EWWW Image Optimizer, ensure you have selected the option “Remove Meta Data” from your images. If you’ve decided to use Adaptive Images for WordPress, also ensure you’ve added the directory location of your adaptive images so they can also be further optimized.
Minify CSS/JS & Inline CSS resources:
- Install WordPress plugin Autoptimize
Inlining of CSS resources can drastically reduce your HTTP request with most of the website styles moved from separate stylesheets right into the HTML body. Within the Autoptimize plugin, enable CSS and JS optimization with the option to Inline CSS styles.
Even though Cloudflare does auto minify resources, we have found it more beneficial to include these in a single HTTP request, to eliminate a few extra requests.
The settings we have used are not for everyone – Try and test by enabling/disabling different components within Autoptimize to find what works best for your website.
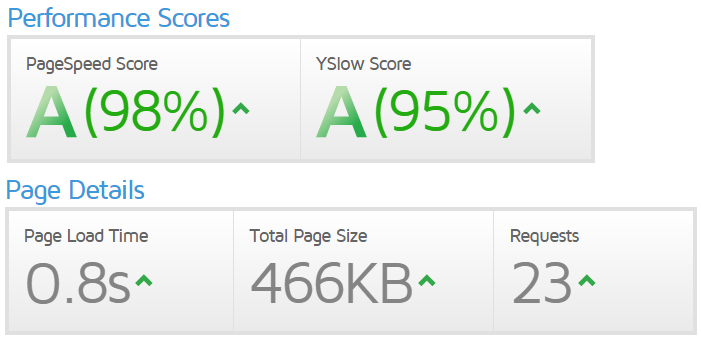
The final page speed result:
The page speed results speak for themselves. With all of the above methods used, we were able to score almost 100% on all Page Speed tests. Even after optimizing, Google Page Speed test still fell short of our expectations and requires a bit more work. We determined that our page speed result was being dragged down by Facebook and Twitter like box plugins.
We hope you enjoyed reading and would love to hear if this guide has helped improve your page speed results. Please post any questions or comments below 🙂
 MooMetric.com Integrating marketing and business metrics using code and non code solutions.
