Contents
If your goal is to improve your visitor experience and increase conversion rates, then you will know that the less effort a visitor has to make to reach the information they are looking for, the more likely they are to convert. Having a visitor fill in a form distracts away from the ultimate goal of having them convert.
One step closer to this goal is to help your customers and populate form fields from URL variables sent in email campaigns. This means your visitors are only one click away from the information they and more likely to convert.
Less information to fill in = higher conversion rates
If you’re already tracking visitor activity using URL or Form variables in Woopra, this will also help in joining your visitor data when an email is clicked across different devices.
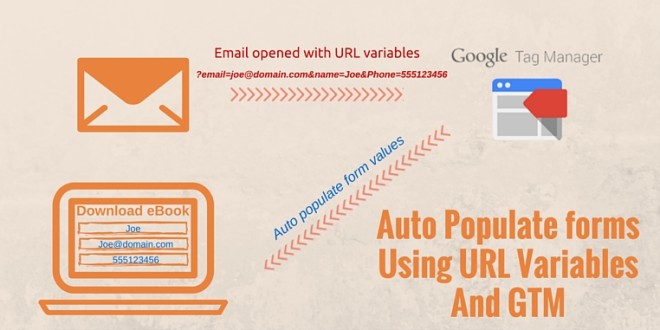
For this example we’re going to take a simple form with a Name, Email and Phone Number, which will auto populate based on a link click from a Mailchimp email to produce what we call a ‘one click form’.
Update your form with field ID’s:
To ensure that our URL variables are passed to the correct fields, we need to first ensure that ID’s are set on each form field which needs to be passed. In this case we are using the Name, Email and Phone Number fields, so we will set our field ID’s to correspond correctly to these fields.
You can tailor this example for your own form fields/variables.
|
1 2 3 4 5 6 |
<form> <input type="text" name="your-name" value="" size="40" id="name"> <input type="text" name="your-phone" value="" size="40" id="phone"> <input type="text" name="your-email" value="" size="40" id="email"> <input type=submit> </form> |
Create URL Variables in GTM:
For the one click form to work, it requires that your visitors are on your mailing list in which you can pass query variables in emails you send. This is possible in email systems such as Mailchimp through the use of merge fields.
For Example: A subscriber clicks a merge link in an email. You want to have all of these 3 fields sent to Woopra to identify that customer for future visits.
http://www.yourwebsite.com/?email[email protected]&name=Fred&phone=123456789
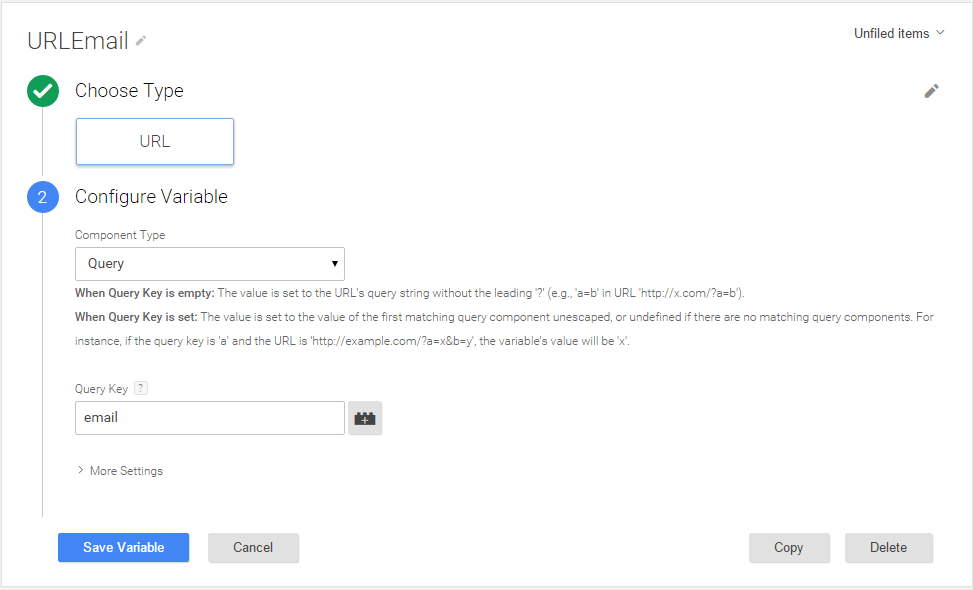
- Open GTM and navigate to Variables > Create new
- Name the variable something you can remember
- Select URL as the variable Type
- Select Query component as the variable
- Enter your query key. In the example below we have used email
- Repeat for variables Name, Phone, etc
Create Trigger in GTM:
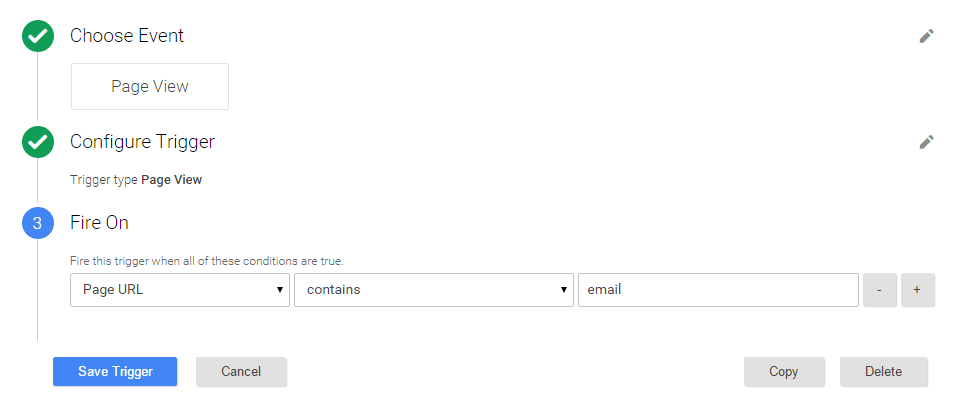
- Open GTM and navigate to Triggers > Create New
- Name the Trigger
- Select Page View as the event
- If you wish, only fire when the Page URL contains the query variable set in the previous step
Create JavaScript Tag in GTM:
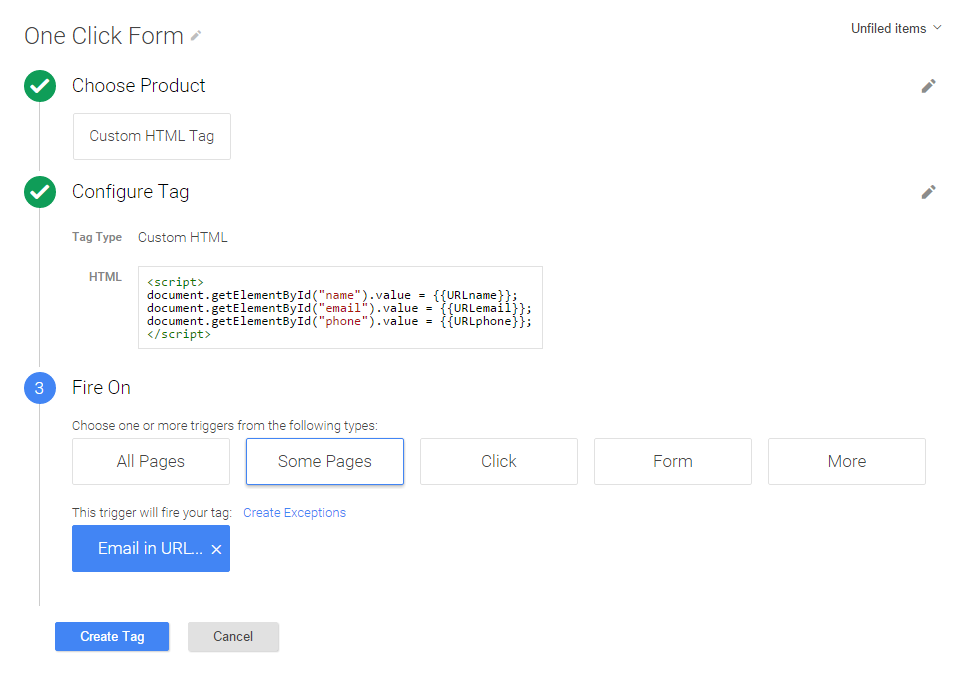
- Open GTM and navigate to Tags > Create New
- Name your tag
- Choose HTML Tag as the product type
- Configure the tag with the JavaScript which will auto populate the form fields
- Add trigger set from the previous step which the tag will fire on
(Note: {{URLEmail}} {{URLName}} & {{URLPhone}} are the names of the variable which you created in GTM)
|
1 2 3 4 5 |
<script> document.getElementById("name").value = {{URLName}}; document.getElementById("email").value = {{URLEmail}}; document.getElementById("phone").value = {{URLPhone}}; </script> |
Woopra Integration:
If you’re using Woopra, you can take this data one step further and start tracking your visitors cross-device as they open your email campaigns through the same URL variables we’ve just created. To do this, simply update the tag code to include the Woopra Identify tracking information.
|
1 2 3 4 5 6 7 8 9 10 11 |
<script> document.getElementById("name").value = {{URLname}}; document.getElementById("email").value = {{URLemail}}; document.getElementById("phone").value = {{URLphone}}; woopra.identify({ email: "{{URLEmail}}", name: "{{URLName}}", phone: "{{URLPhone}}" }); woopra.track(); </script> |
Test out your form with URL variables:
The final step is to test out the work you’ve just done by passing a fake variable to see if your form fields auto populate.
http://www.yourwebsite.com/?email[email protected]&name=Fred&phone=123456789
If everything is working, you should see your form fields populated with the name, email and phone from the example URL above. If it’s not working, ensure you’ve published your GTM container and you’ve typed in your URL correct.
Hope you’ve enjoyed reading – please post any questions or comments you might have below :).
 MooMetric.com Integrating marketing and business metrics using code and non code solutions.


